Getting up and running
ServiceCatalog-Puppet runs in your AWS Account. In order for you to install it into your account you can use the aws-service-catalog-puppet cli. This is distributed via [PyPi](https://pypi.org/project/aws-service-catalog-puppet/)
What am I going to install?
ServiceCatalog-Puppet is bootstrapped from your local machine. You install a command line utility that will provision the resources you need into your AWS Account. Once you have completed the bootstrap you will have the following pipeline in your account:
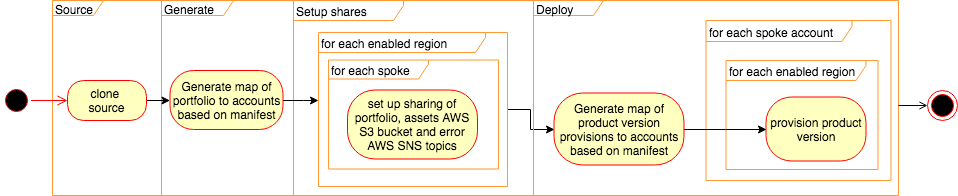
using the following services:
Before you install
You should consider which account will be the home for your puppet. This account will contain the AWS CodePipelines and will need to be accessible to any accounts you would like to share with. If you are using ServiceCatalog-Factory, we recommend you install both tools into the same account.
Installing the tool
This is a python cli built using Python 3.
It is good practice to install Python libraries in isolated environments. You can create the a virtual environment using the following command:
virtualenv --python=python3.7 venv
source venv/bin/activate
Once you have decided where to install the library you can install the package:
pip install aws-service-catalog-puppet
This will install the library and all of the dependencies.
Setting it up
The Puppet will run in your account and needs some configuration. You will need to stand up the puppet and set up the configuration for it to run smoothly.
You will also need to provision an IAM Role within the _spoke_ accounts - those you want to provision products in.
Bootstrap your spokes
You will need to bootstrap each of your spokes. In order to do so please export your credentials and then run:
servicecatalog-puppet bootstrap-spoke <ACCOUNT_ID_OF_YOUR_PUPPET>
Bootstrap your account
There are two or threes parts to bootstrapping the puppet.
Setting up your global configuration
The first is concerned with setting the global configurations. To do this we use AWS SSM Parameters. To get setup you need to create a configuration file with a list of regions you want to use. You must also specify if you want to collect the CloudFormation events from provisioning actions via SQS.
Here is an example config.yaml:
regions: [
  'us-east-2',
  'us-east-1',
  'us-west-1',
  'us-west-2',
  'ap-south-1',
  'ap-northeast-2',
  'ap-southeast-1',
  'ap-southeast-2',
  'ap-northeast-1',
  'ca-central-1',
  'eu-west-1',
  'eu-west-2',
  'eu-west-3',
  'sa-east-1',
]
should_collect_cloudformation_events: false
should_forward_events_to_eventbridge: true
should_forward_failures_to_opscenter: true
Note
should_collect_cloudformation_events was added in version 0.33.0
Note
should_forward_events_to_eventbridge was added in version 0.35.0 should_forward_failures_to_opscenter was added in version 0.35.0
Once you have this file you need to upload the config:
servicecatalog-puppet upload-config config.yaml
If you make changes to this you will need to run upload-config and bootstrap commands again for the changes to occur.
Once that has completed you are ready to bring up the rest of the puppet.
Setting to to use AWS Organizations
The second part to bootstrapping is optional. If you would like to use AWS Organizations features in your manifest file you will need to set which IAM Role should be used to perform these actions.
To create the correct role in your organization master export your credentials or change profile and run the following:
servicecatalog-puppet bootstrap-org-master <ACCOUNT_ID_OF_YOUR_PUPPET>
This command will provision a role the account you specified and output the ARN of the role.
Once you have the ARN or you know the ARN you want to use you can configure the framework to use it. Export the credentials for your puppet account or change your profile so you are using your puppet account and run the following command:
servicecatalog-puppet set-org-iam-role-arn <THE_ARN_YOU_WANT_TO_USE>
Once you have run that command you are ready for the final stage.
Configuring your puppet
When you bootstrap your account you can choose whether to have a manual approval step in your deployment pipeline.
If you choose to enable manual approvals an AWS SNS Topic with the ARN
arn:aws:sns:${AWS::Region}:${AWS::AccountId}:service-catalog-puppet-dry-run-approvals will be created to notify you
when approvals are required.
To start the bootstrap process you must run the following in your master account:
servicecatalog-puppet bootstrap
If you want to enable manual approvals you must bootstrap using the following command:
servicecatalog-puppet bootstrap --with-manual-approvals
Setup your puppet
Clone the configuration repo and configure your factory by editing the manifest.yaml file:
git clone --config 'credential.helper=!aws codecommit credential-helper $@' --config 'credential.UseHttpPath=true' https://git-codecommit.eu-west-1.amazonaws.com/v1/repos/ServiceCatalogPuppet
servicecatalog-puppet seed simple ServiceCatalogPuppet
cd ServiceCatalogPuppet
vim manifest.yaml
git add .
git commit -am "initial add"
git push
Wait for pipeline to complete and you have a working puppet.